Home › How to upload GST invoices on KFIN and CAMS
Step by step guide
Your monthly GST invoices, start to finish
By MFD Office · Updated 10 September 2026
Every month, KFIN and CAMS need a signed GST invoice from you for each fund house, uploaded by around the 15th. This page shows the whole thing, one small step at a time. No computer skills needed beyond downloading a file and uploading it back.
Want to see it working before you read further? Upload your own KFIN or CAMS file on the free demo and see one of your real, signed invoices, no signup, no card. Try the demo →
You collect files from the registrar, MFD Office turns them into signed invoices, and you put them back. That is all.
1 · Get your files from KFIN or CAMS
Two files per registrar
→
2 · MFD Office does the work
A signed invoice for every fund house, in minutes
→
3 · Upload back to KFIN or CAMS
Same website, same place
→
4 · Done
The fund houses can now pay the GST on your brokerage
Before your first month · one time only
Set up MFD Office once
Takes about five minutes. You never repeat this. Not ready for an account? Try the demo first, it needs no signup.
A
Create your free account
Go to mfdoffice.com and click Create account. Your first month is free.
B
Save your signature
In the Setup tab, draw or upload your signature once. It goes on every invoice after that.
C
Add your ARN
Type your ARN number once. MFD Office checks your files against it so nothing gets mixed up.
Part 1 · KFIN
Fund houses serviced by KFIN
Six small steps. Steps 1 to 3 happen on the KFIN website, steps 4 and 5 in MFD Office, step 6 back on KFIN. If you only file on CAMS, skip ahead to Part 2.
1
On the KFIN website
Sign in to the KFIN distributor portal
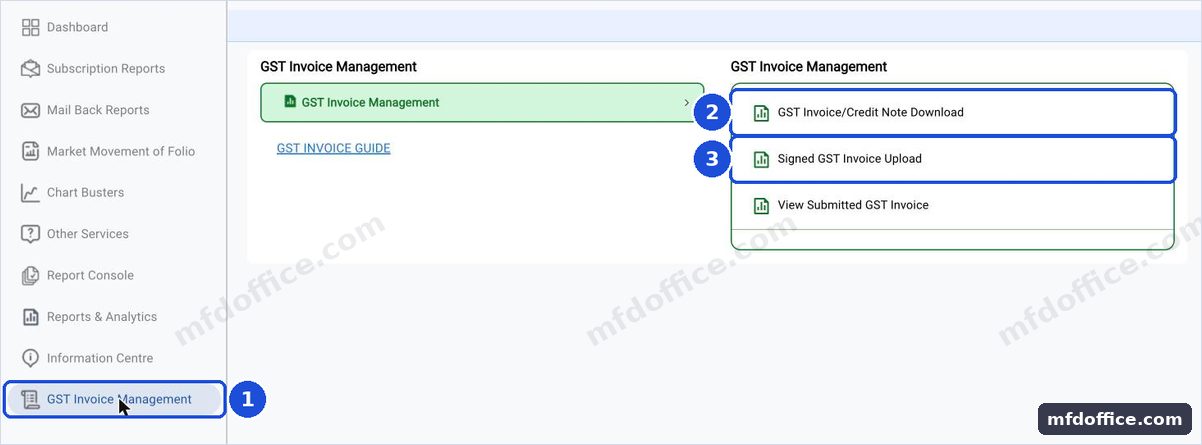
Open dss.kfintech.com in your browser and sign in with your KFIN login. Then open the GST Invoice Management section.
dss.kfintech.com›Sign in›GST Invoice Management
1 is GST Invoice Management, at the foot of the side menu. It opens the two screens you need: 2 for your invoices, 3 for the template and the upload. Slide the picture sideways to see all of it.
2
On the KFIN website
Download the month's invoice ZIP
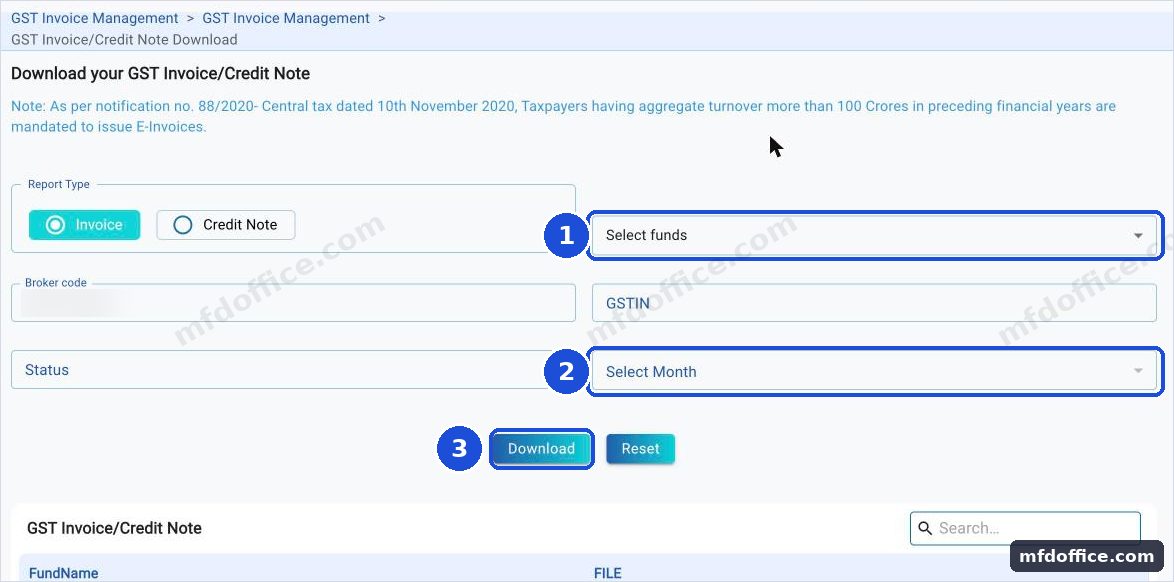
Inside GST Invoice Management, open GST Invoice / Credit Note Download and download the ZIP file for the month. It holds one invoice file per fund house.
Leave Report Type on Invoice. 1 is your fund houses, 2 is the trail month, 3 is Download. Your broker code is filled in already. Slide the picture sideways to see all of it.You get a file like: All_Funds_GST_June-2026~ARN-XXXXXX.zip
3
On the KFIN website
Download the Excel template
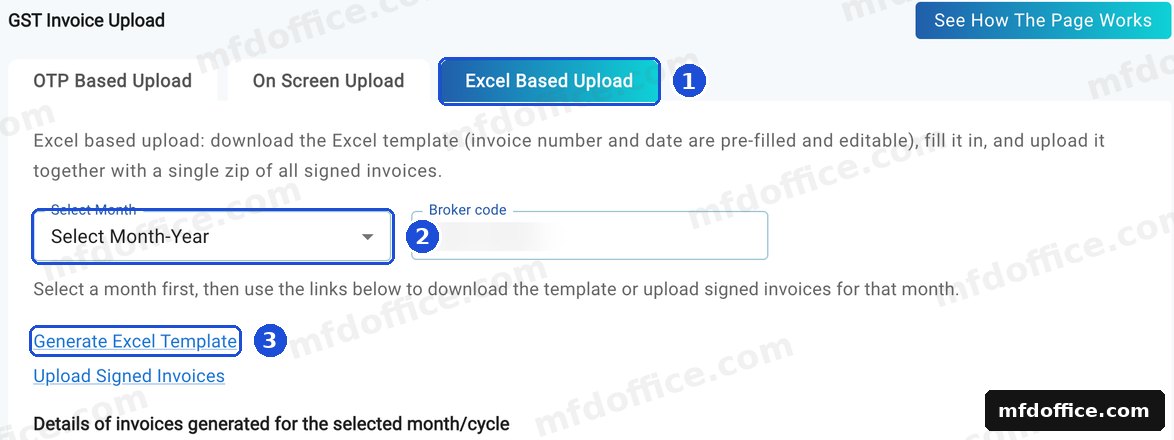
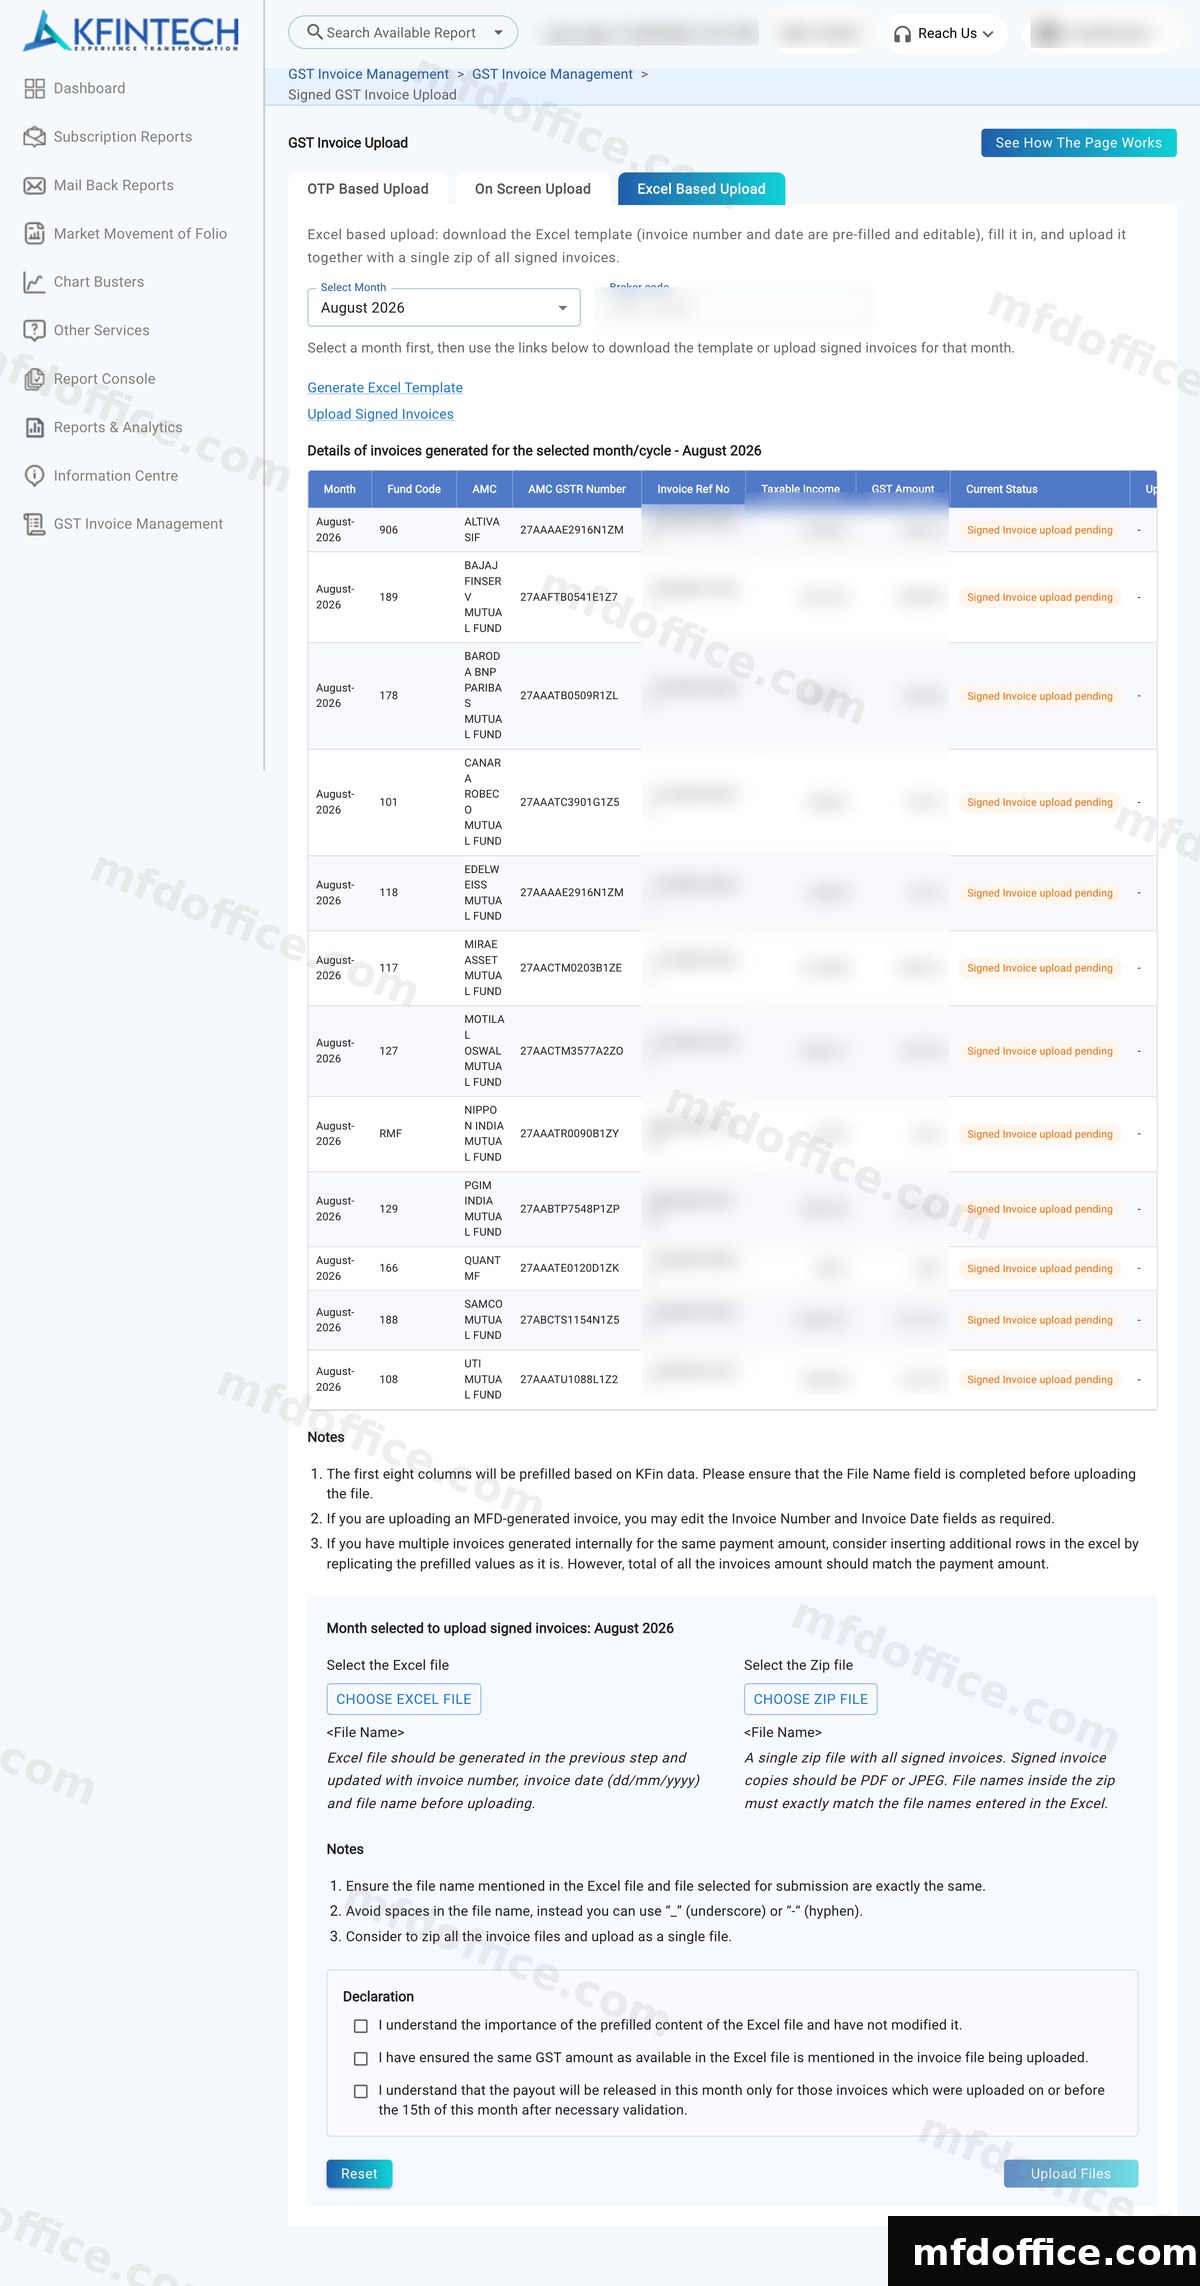
Still inside GST Invoice Management, open Signed GST Invoice Upload. Click the Excel Based Upload tab. Choose the same month in Select Month first. Then click Generate Excel Template. KFIN gives you a prefilled Excel sheet, one row per invoice. Do not type anything into it. MFD Office fills it for you.
1 is the Excel Based Upload tab. 2 is Select Month. Choose it before you click 3. 3 is Generate Excel Template. The link does nothing until a month is picked. Slide the picture sideways to see all of it.You get a file like: GST_Invoice_Template_2026-06.xlsx
💡Use the Excel Based Upload tab for KFIN every month. You use it twice: for the template now, and for the upload at the end.
💡You now have 2 files. Keep them together, for example in one folder on your computer, or just in Downloads.
4
In MFD Office
Upload both files and make your invoices
Sign in to MFD Office and open the Generate tab. Choose your ARN, choose KFIN as the registrar, and upload the two files from steps 2 and 3. Tick the fund houses you want, then press Make all invoices.
mfdoffice.com›Generate›Choose KFIN›Upload 2 files›Make all invoices
MFD Office reads KFIN's own figures, makes a GST invoice for every fund house, puts your signature on each one, and fills the Excel template to match. Every number stays exactly as KFIN computed it. You can preview one invoice free before you decide.
5
In MFD Office
Download your finished set
When it is ready, download your bundle. It has the signed invoice for every fund house plus the completed Excel template, in the exact format KFIN expects. Nothing to edit.
Signed invoices ZIPCompleted Excel template
✓
Back on the KFIN website
Upload the set back to KFIN
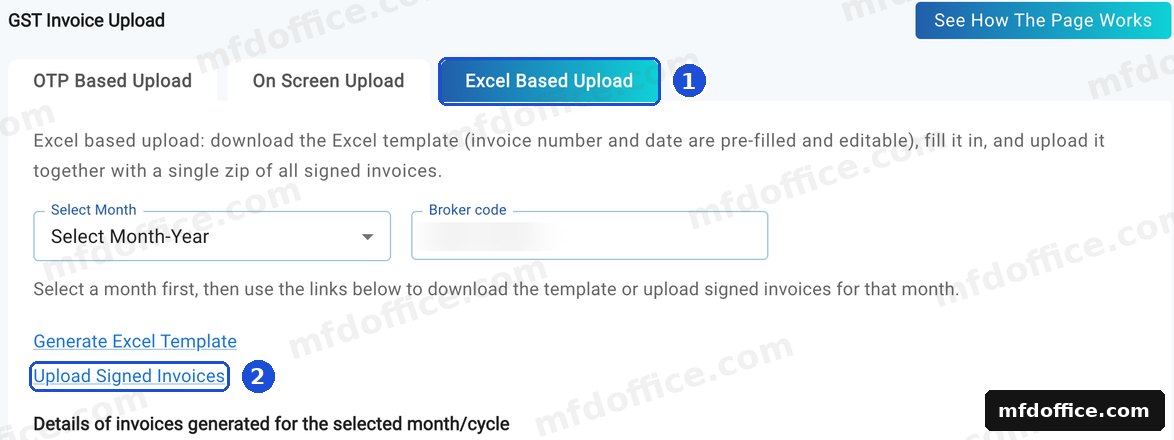
Go back to dss.kfintech.com › GST Invoice Management › Signed GST Invoice Upload. Click the Excel Based Upload tab again and pick the same month. The table below fills in with that month's fund houses, and an upload panel appears underneath it.
dss.kfintech.com›GST Invoice Management›Signed GST Invoice Upload›Excel Based Upload›Select Month
1 is the Excel Based Upload tab. 2 is Upload Signed Invoices, the link just under the one you used for the template. Slide the picture sideways to see all of it.
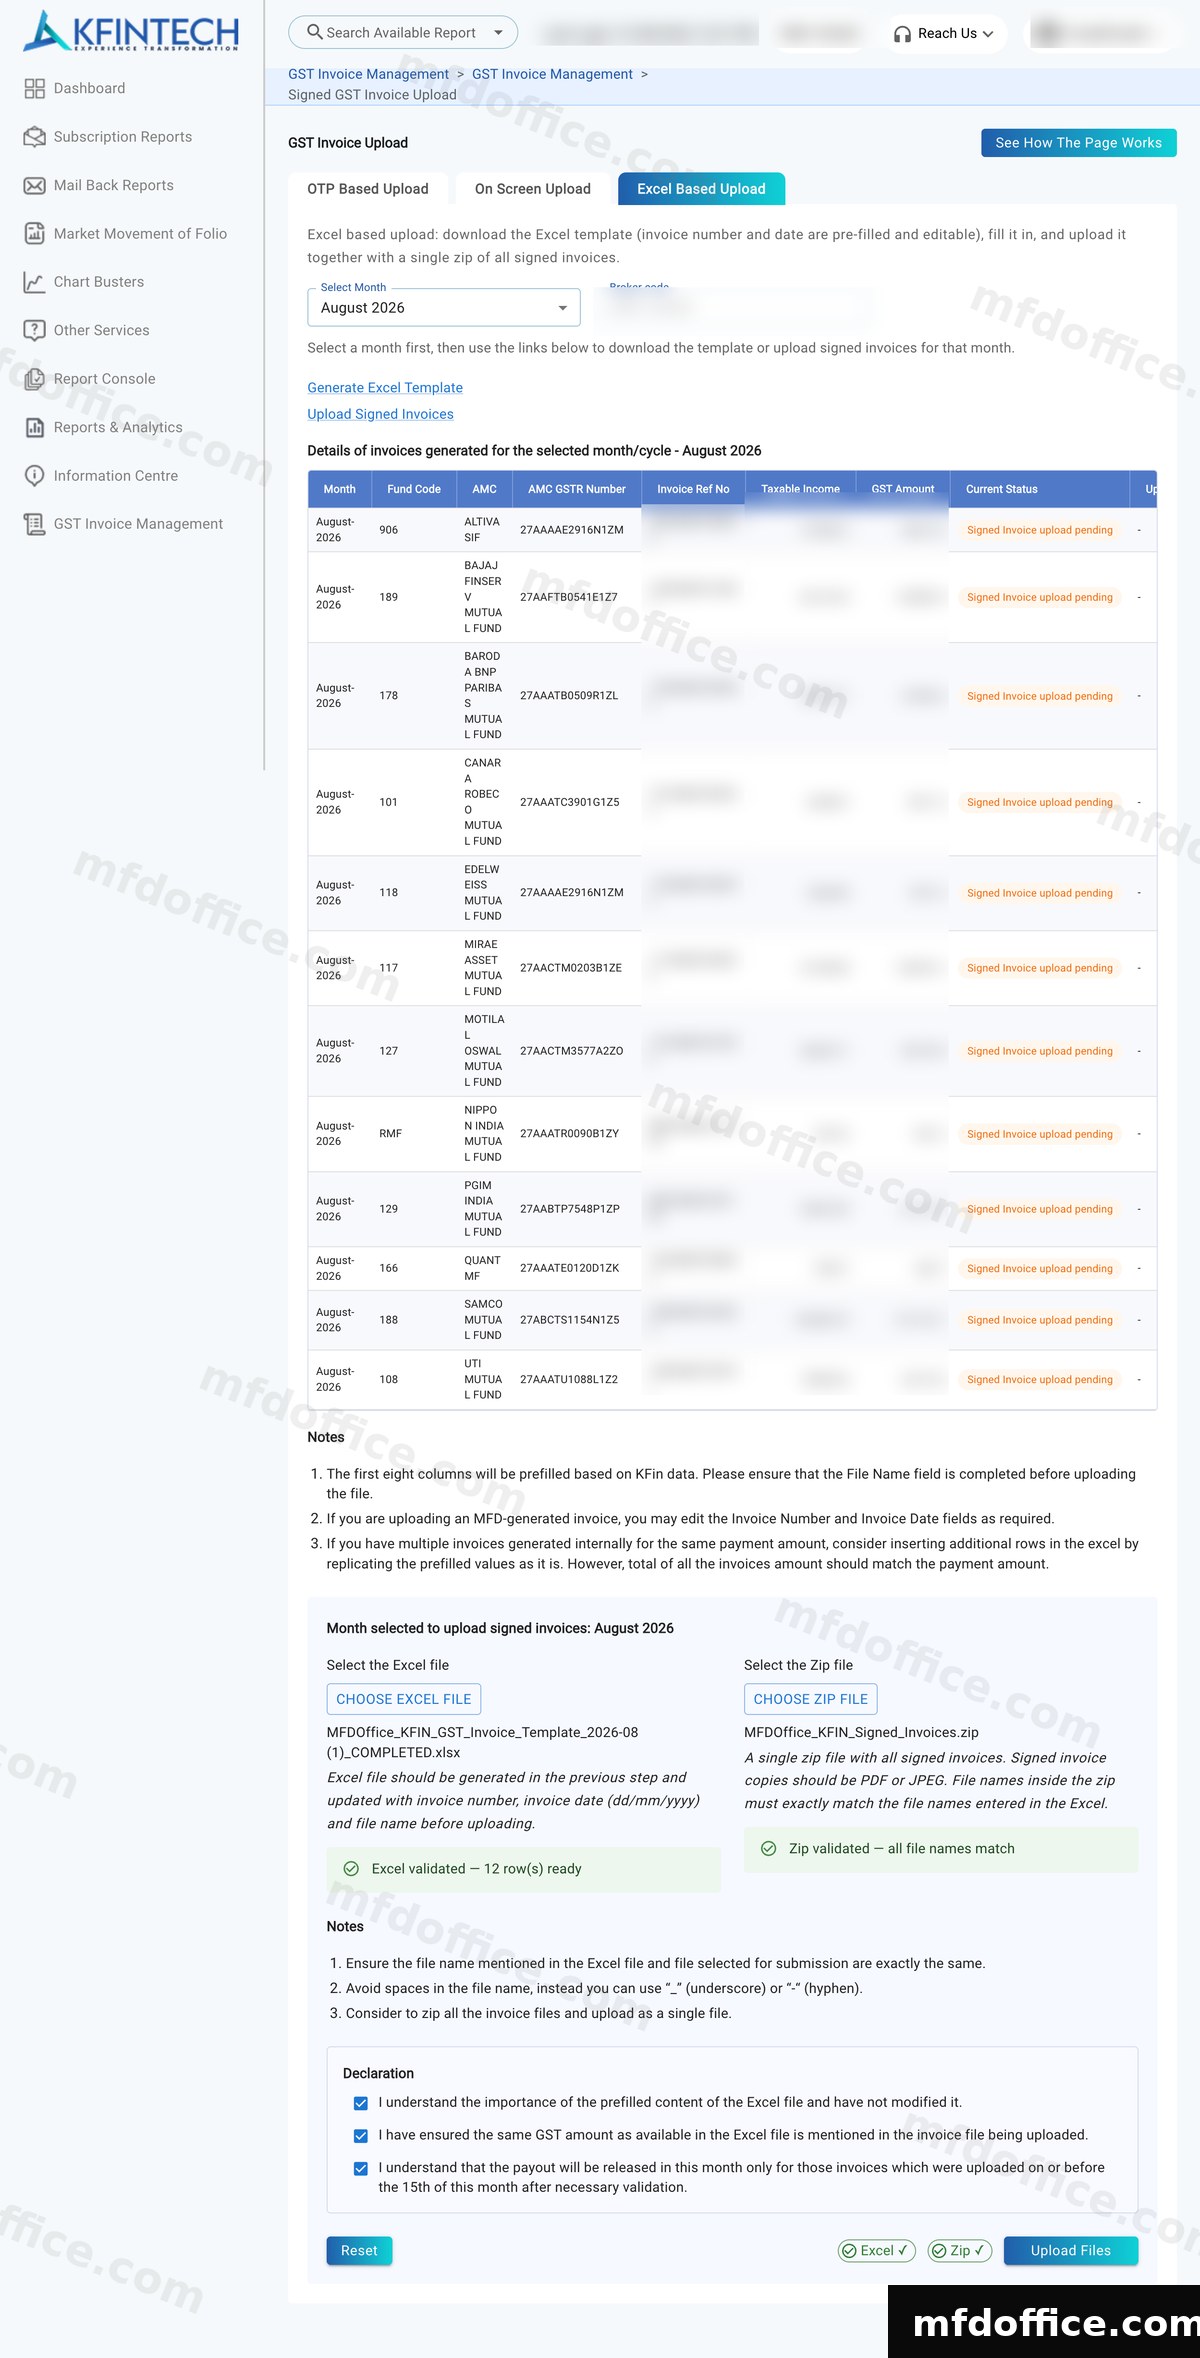
Under Select the Excel file, choose the completed Excel template MFD Office gave you. Under Select the Zip file, choose the signed invoices ZIP. KFIN checks both files and shows a green tick against each once they are ready.
The upload panel sits below the invoice table. Choose your Excel file on the left and your ZIP on the right. Slide the picture sideways to see all of it.
Once both files show as validated, tick all three boxes under Declaration, then press Upload Files. That is KFIN done for the month.
Select the Excel file›Select the Zip file›Tick all 3 declarations›Upload Files ✓
Both files show validated, all three declarations are ticked, and Upload Files is ready to press. Slide the picture sideways to see all of it.
Part 2 · CAMS
Fund houses serviced by CAMS
Six small steps. One difference to know: on CAMS the two files come from two different screens. You ask for the invoice file on one screen and CAMS emails it to you, and you take the Excel template from another screen. This guide keeps them apart so they never get mixed up. If you only file on KFIN, jump back to Part 1.
1
On the CAMS website
Sign in on camsonline.com
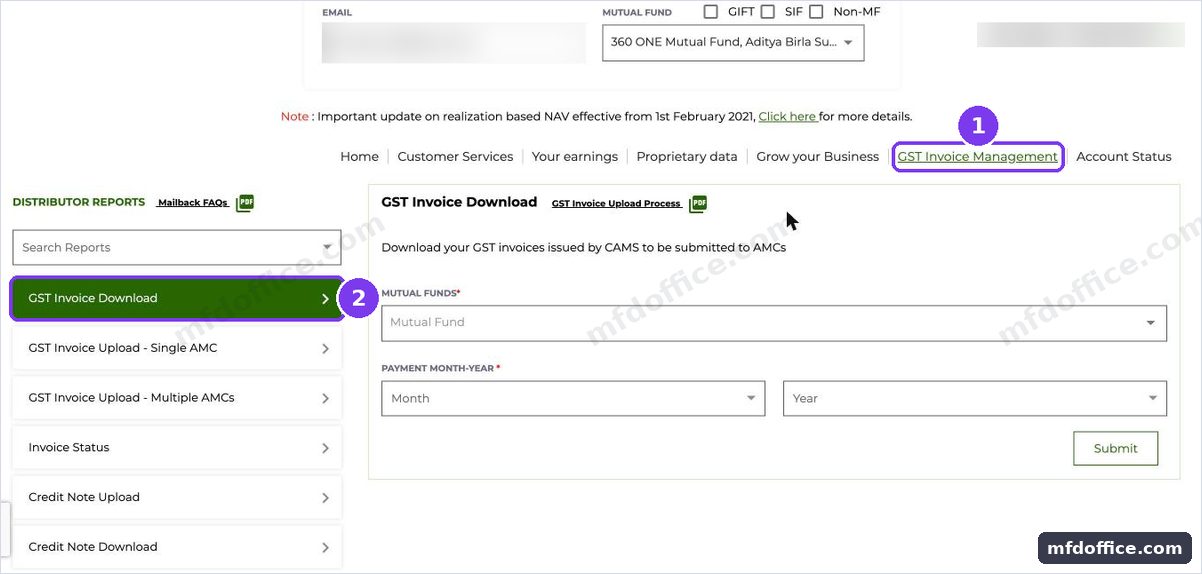
Open camsonline.com, go to the Distributors / RIA tab, then Service Requests, then Distributor Mailback Services, and sign in with your CAMS login. Near the top of the page, open the Mutual Fund dropdown and tick All Mutual Funds, this is what makes the row of links, including GST Invoice Management, appear. Open it.
1 is GST Invoice Management in the row of links. 2 is GST Invoice Download in the side menu, which you use in the next step. Slide the picture sideways to see all of it.
💡CAMS redesigned this section on 14 Aug 2026. The side menu is now GST Invoice Download, GST Invoice Upload, Invoice Status, Credit Note Download, Credit Note Upload, one Upload screen instead of the old split by AMC count.
2
On the CAMS website
Ask CAMS for the month's invoices
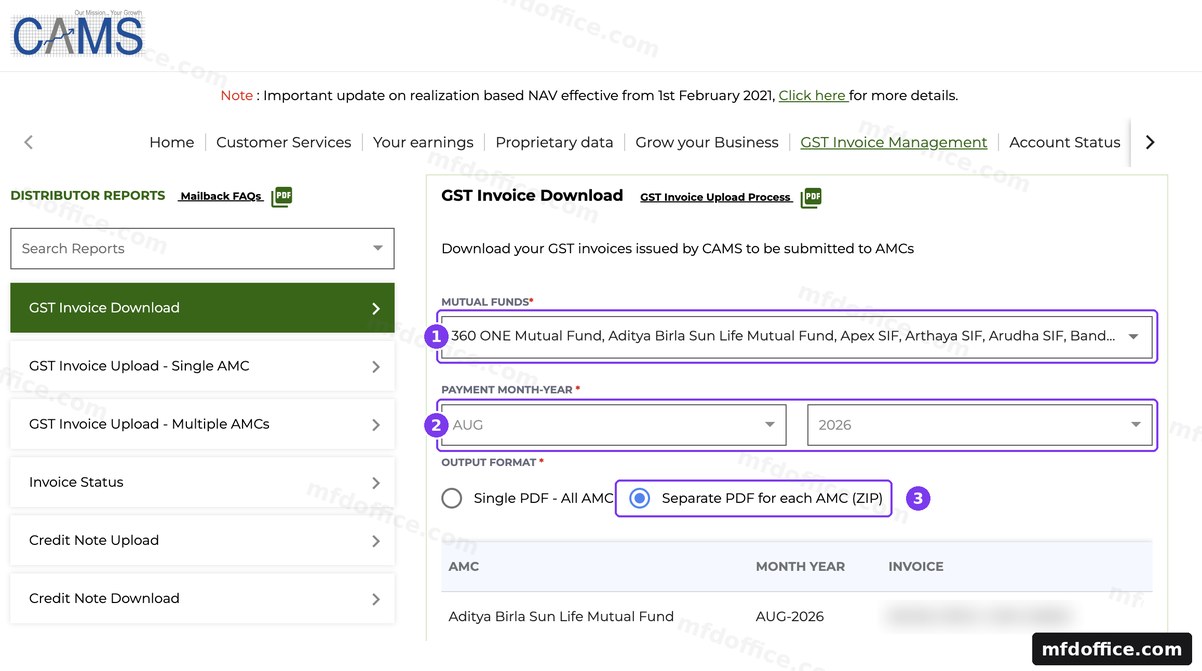
In the side menu, open GST Invoice Download. Pick your fund houses, then pick the payment month and year. Under Output format, both choices work with MFD Office. Then press Submit. CAMS then sends the invoices to the email address registered with them. Open that inbox and save what it sends you.
GST Invoice Management›GST Invoice Download›Pick funds and month›Pick either Output format›Submit
⚠️Either Output format is fine. This choice only appears further down the page after your fund houses and month have loaded the pending invoice list. Separate PDF for each AMC (ZIP) emails you a ZIP with one invoice file for each fund house. Single PDF - All AMC emails you a single PDF with every invoice on its own page. MFD Office reads either one, so pick whichever you prefer.
1 is the fund house picker, select every fund house. 2 is the payment month and year. 3 is Output format, either Separate PDF for each AMC (ZIP) or Single PDF - All AMC works. Slide the picture sideways to see all of it.
💡Email not arrived? Search your inbox for "CAMS" and check the spam folder. If nothing arrives at all, you may not be registered for the Distributor Mailback Service yet, which you can do on camsonline.com.
3
On the CAMS website
Take the Excel report from the same email
The CAMS email holds two things. One is the invoice file. It is a ZIP if you chose Separate PDF for each AMC, or a single PDF if you chose Single PDF - All AMC. The other is an Excel file whose name starts with GST_REPORT. That Excel file is the one MFD Office needs. It already has the taxable value and the GST amounts filled in by CAMS. Save both files from the email into the same folder. Do not type anything into the sheet. MFD Office fills the rest for you.
Your email from CAMS›Save the invoice file›Save the GST_REPORT Excel file ✓
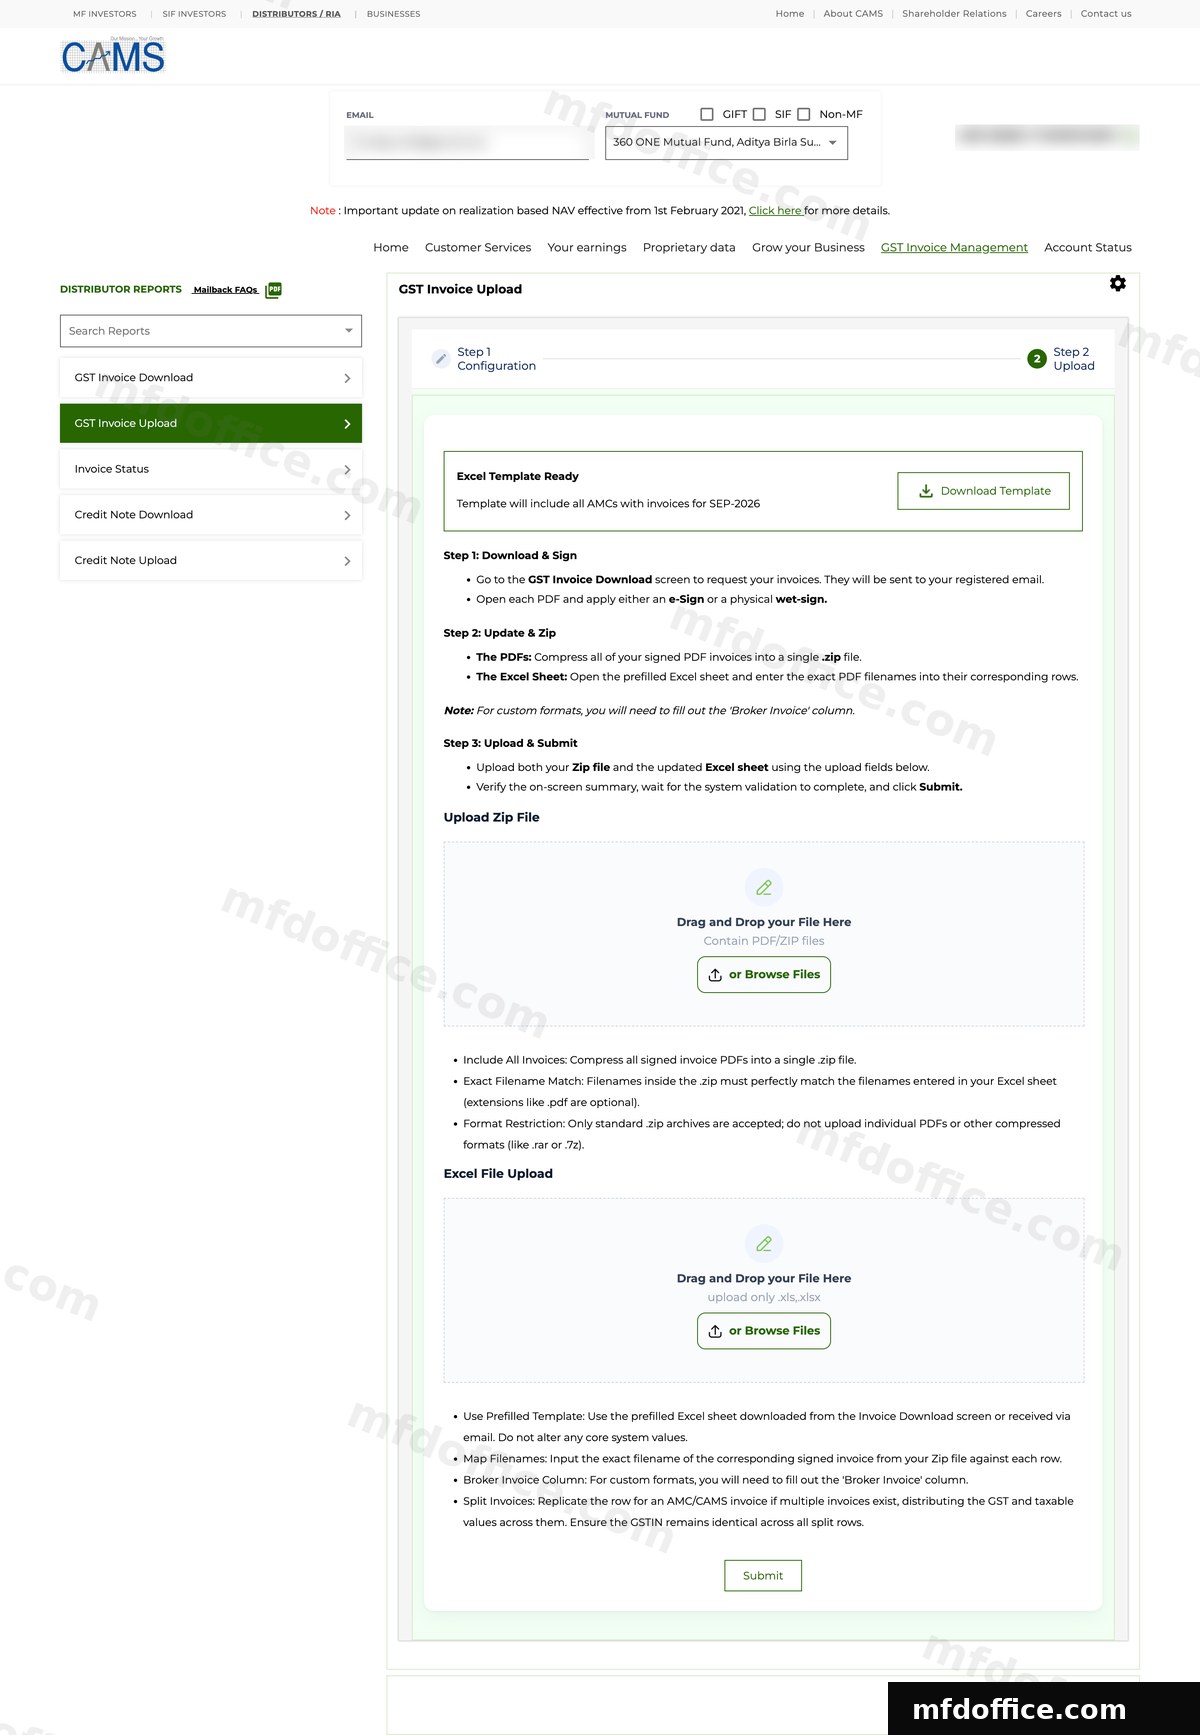
⚠️If the upload screen offers you a "Download Template" or "Excel Template Ready" button, skip it. CAMS shows this on the upload screen either way. You do not need it, you already have the file: upload the GST_REPORT Excel sheet straight from your CAMS email instead, filled in for you by MFD Office.
💡You now have 2 files, and both came from the same email. The invoice file (ZIP or PDF), and the Excel file whose name starts with GST_REPORT. Keep them together.
4
In MFD Office
Upload both files and make your invoices
Sign in to MFD Office and open the Generate tab. Choose your ARN, choose CAMS as the registrar, and upload the two files: the ZIP from your email and the Excel from the CAMS website. Tick the fund houses you want, then press Make all invoices.
mfdoffice.com›Generate›Choose CAMS›Upload 2 files›Make all invoices
MFD Office reads CAMS's own figures, makes a GST invoice for every fund house, puts your signature on each one, and fills the sheet to match. Every number stays exactly as CAMS computed it. You can preview one invoice free before you decide.
5
In MFD Office
Download your finished set
When it is ready, download your bundle. It has the signed invoice for every CAMS fund house plus the completed sheet, in the exact format CAMS expects. Nothing to edit.
Signed invoicesCompleted Excel sheet
✓
Back on the CAMS website
Upload the set back to CAMS
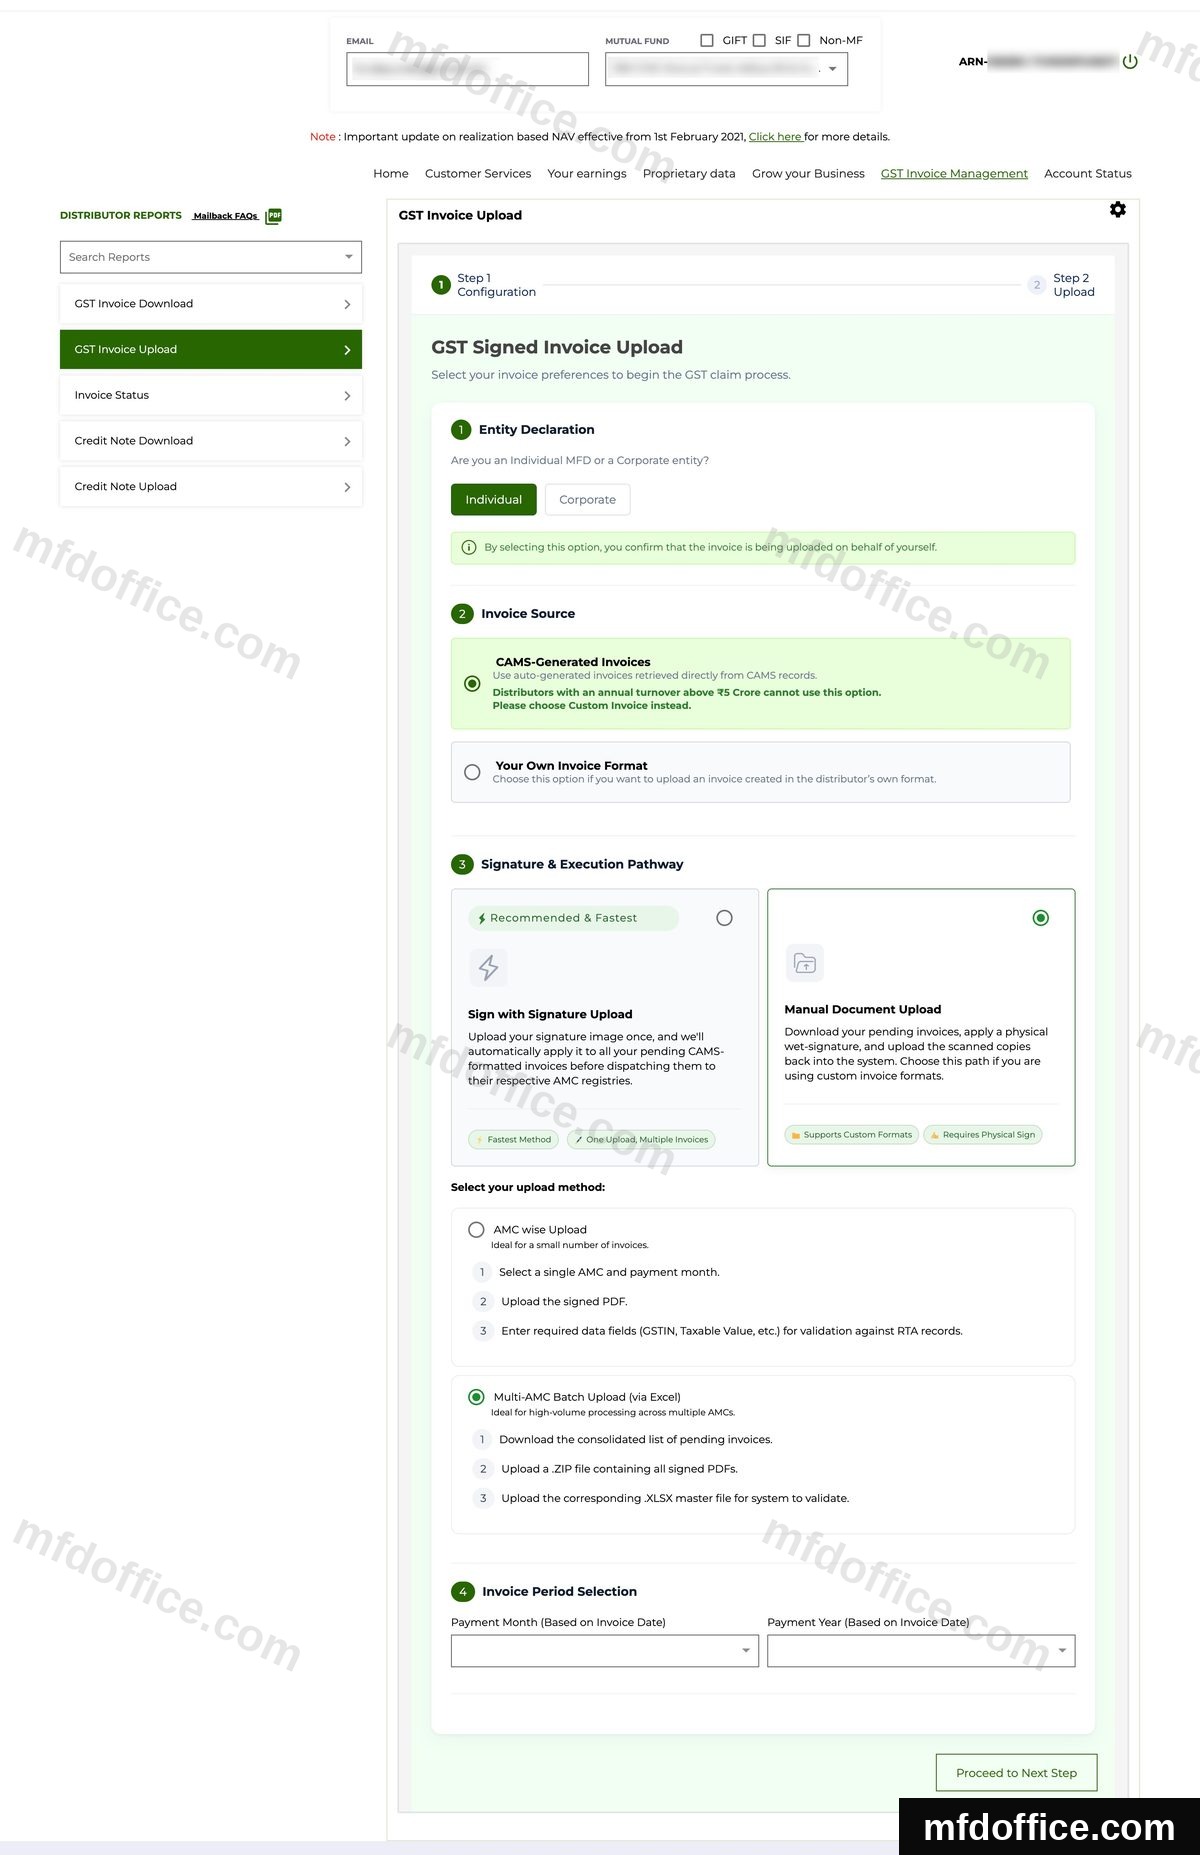
Go back to GST Invoice Management and open GST Invoice Upload. This is now a short wizard, walk through it once: pick Individual (or Corporate, if that is you). For Invoice Source, your yearly turnover decides which one to pick. ₹5 crore or under: pick CAMS-Generated Invoices. Above ₹5 crore: pick Your Own Invoice Format, CAMS does not give you a choice at that turnover. Either way, for Signature & Execution Pathway, pick Manual Document Upload, not the OTP e-Sign card. Under upload method, pick Multi-AMC Batch Upload (via Excel), set your payment month and year, then press Proceed to Next Step.
camsonline.com›GST Invoice Management›GST Invoice Upload›CAMS-Generated Invoices (₹5cr or under) / Your Own Invoice Format (above ₹5cr)›Manual Document Upload›Multi-AMC Batch Upload (via Excel)
Do not pick the card on the left, Sign with Signature Upload, even though CAMS marks it Recommended and Fastest. Despite its name, that card is not for uploading your own signed document, it is CAMS's own paid auto-sign service (an OTP e-Sign, shown with a yearly fee on the next screen). Pick Manual Document Upload on the right, as shown here, since MFD Office already gives you signed invoices. Slide the picture sideways to see all of it.
⚠️If your turnover is ₹5 crore or under and CAMS does not accept your MFD Office files under CAMS-Generated Invoices, do not worry. Go back to Invoice Source and pick Your Own Invoice Format instead. Your ZIP and Excel sheet from MFD Office stay exactly the same, only this one choice on the screen changes.
Press Proceed to Next Step and CAMS takes you to the Upload screen. It shows a Download Template button up top, but skip it, you already have your completed Excel sheet from MFD Office. Just drop your ZIP file in the first box and your Excel sheet in the second box, or press Browse Files to pick them from your computer.
Proceed to Next Step›Upload Zip File›Excel File Upload
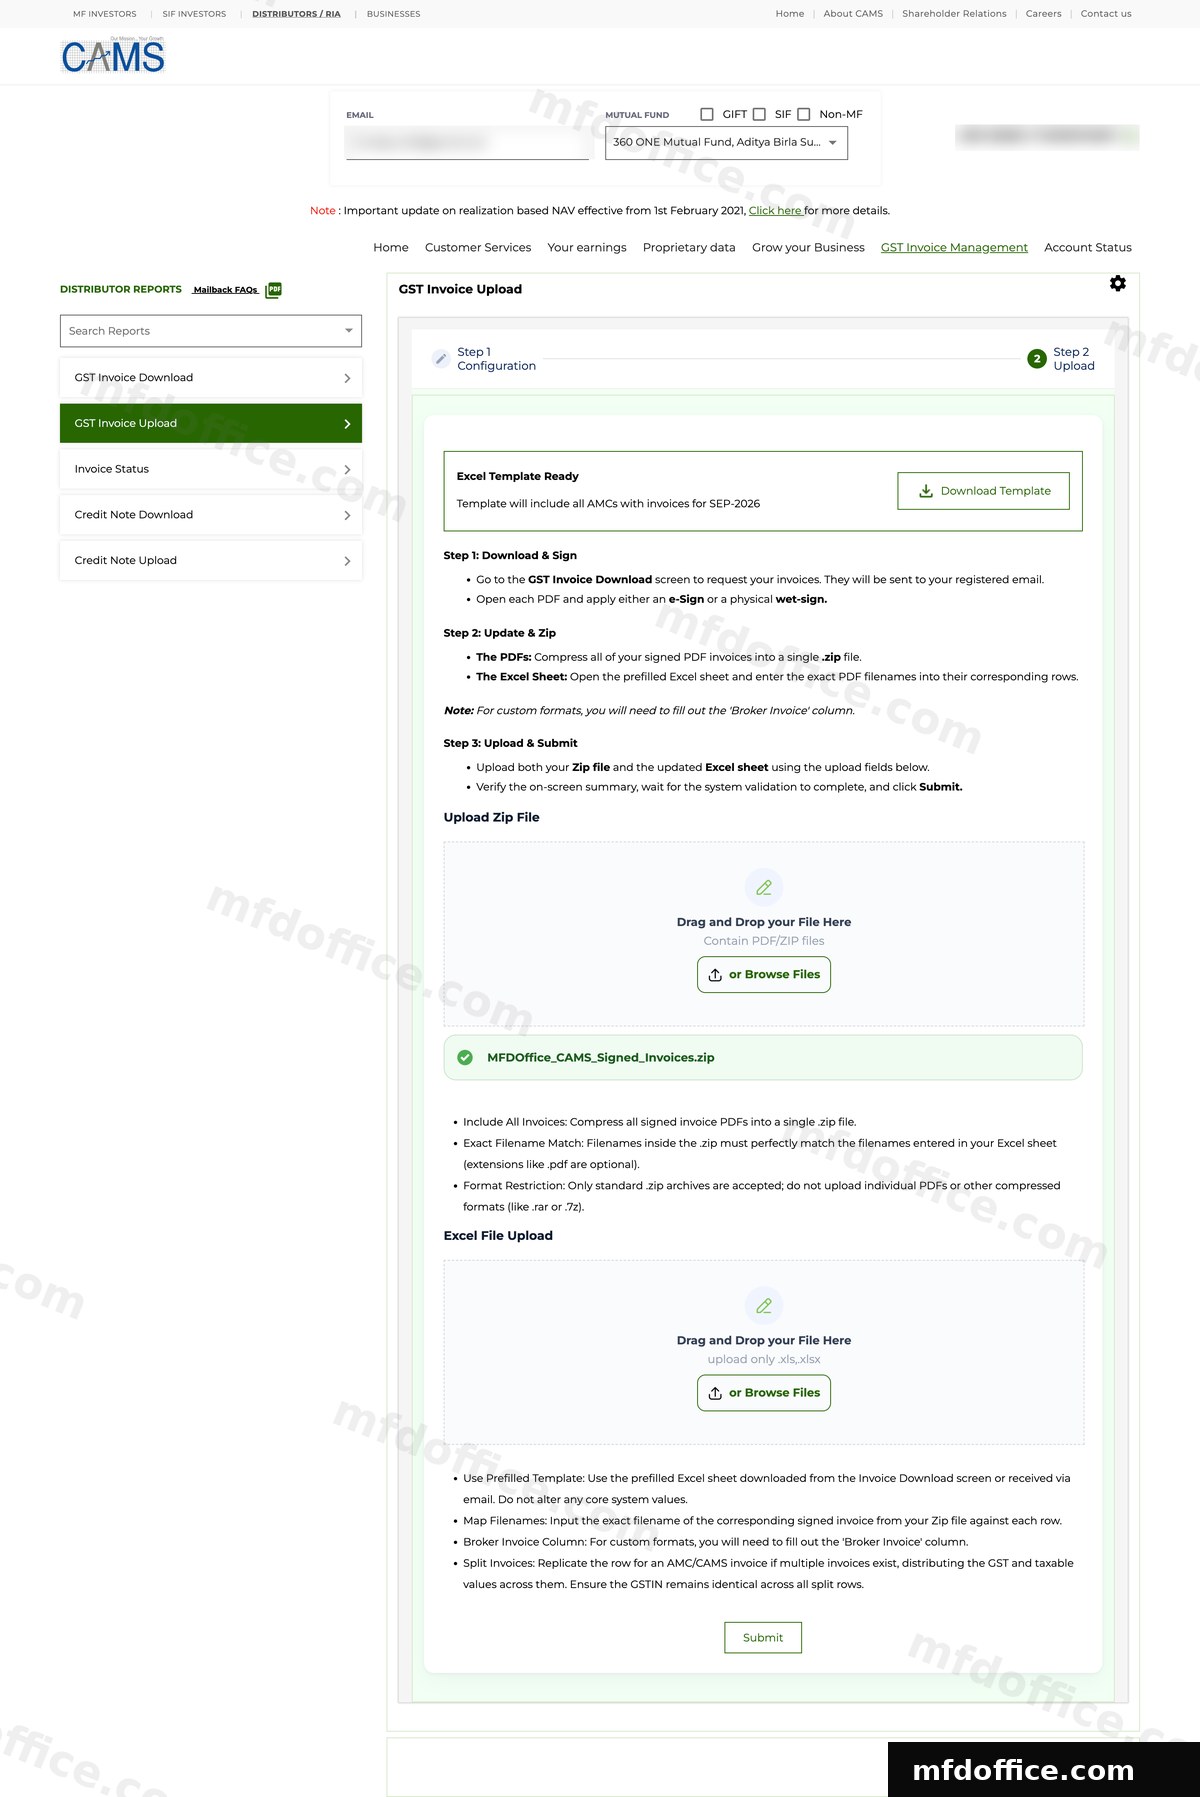
Ignore the Download Template button at the top. MFD Office already gave you the completed sheet, so you do not need a fresh one from CAMS. Drop your ZIP in the first box and your Excel sheet in the second. Slide the picture sideways to see all of it.
Once a file is in, it shows as a green chip like this. Drop your Excel sheet the same way in the second box. Slide the picture sideways to see all of it.
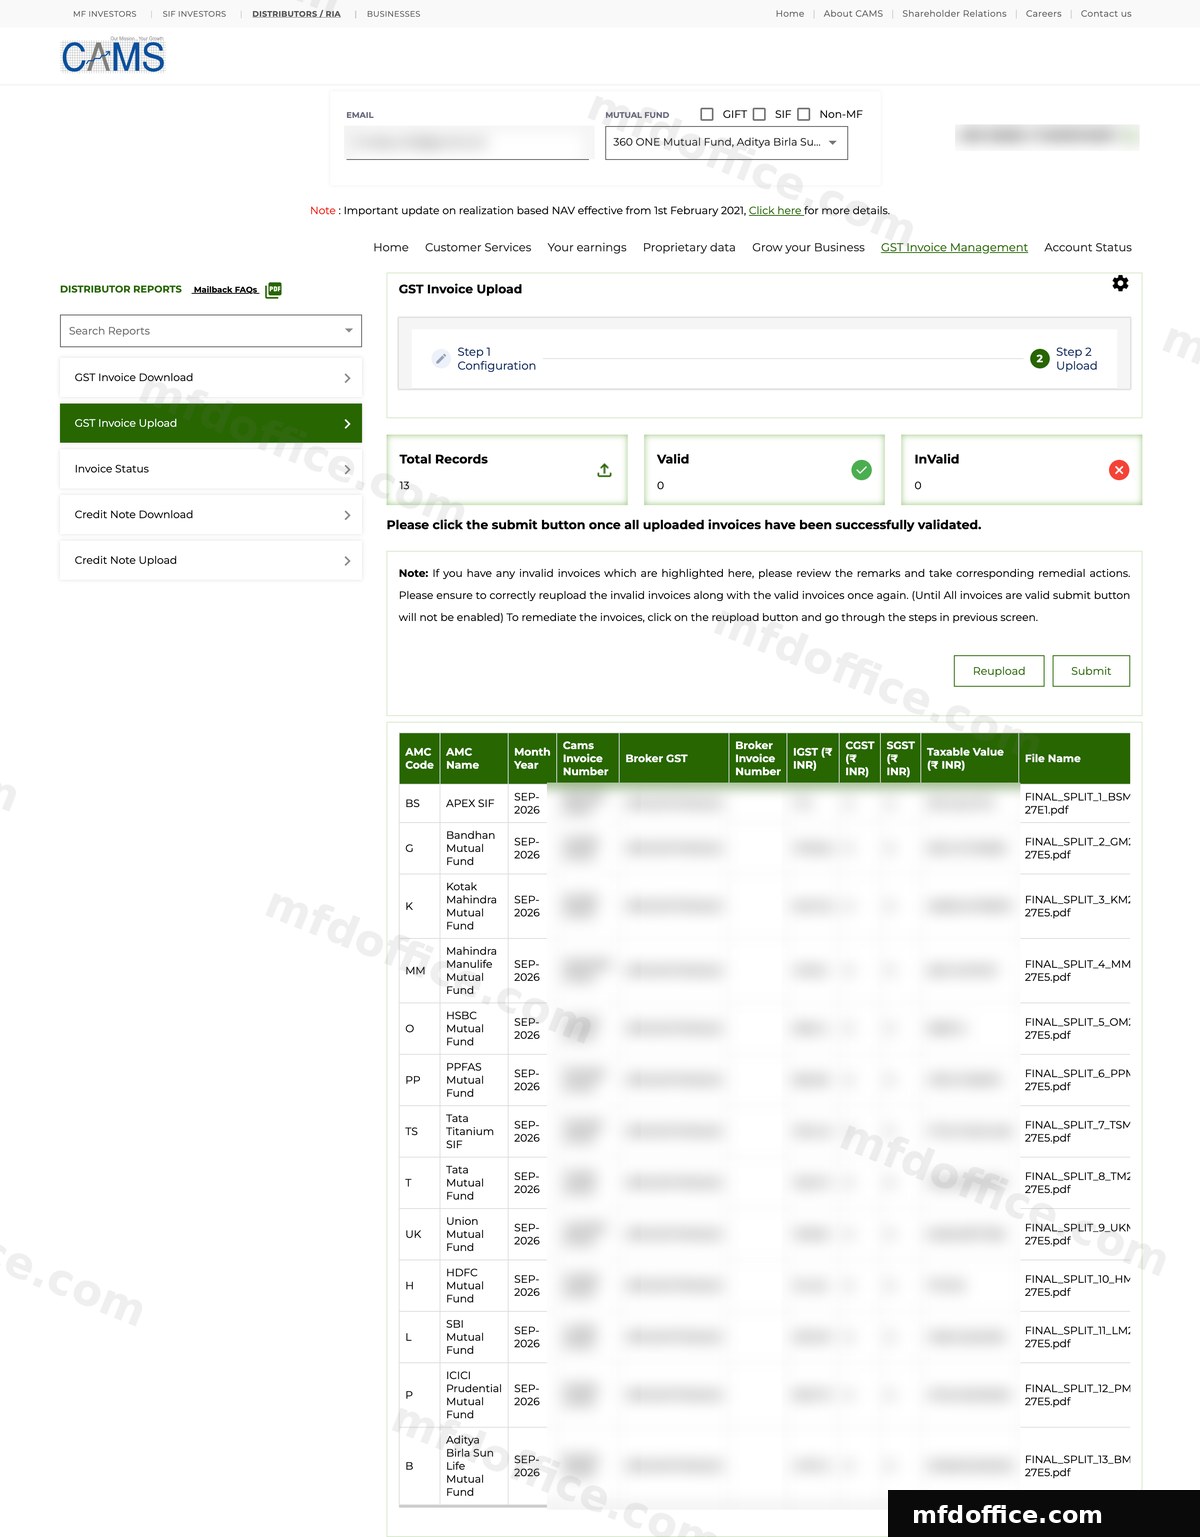
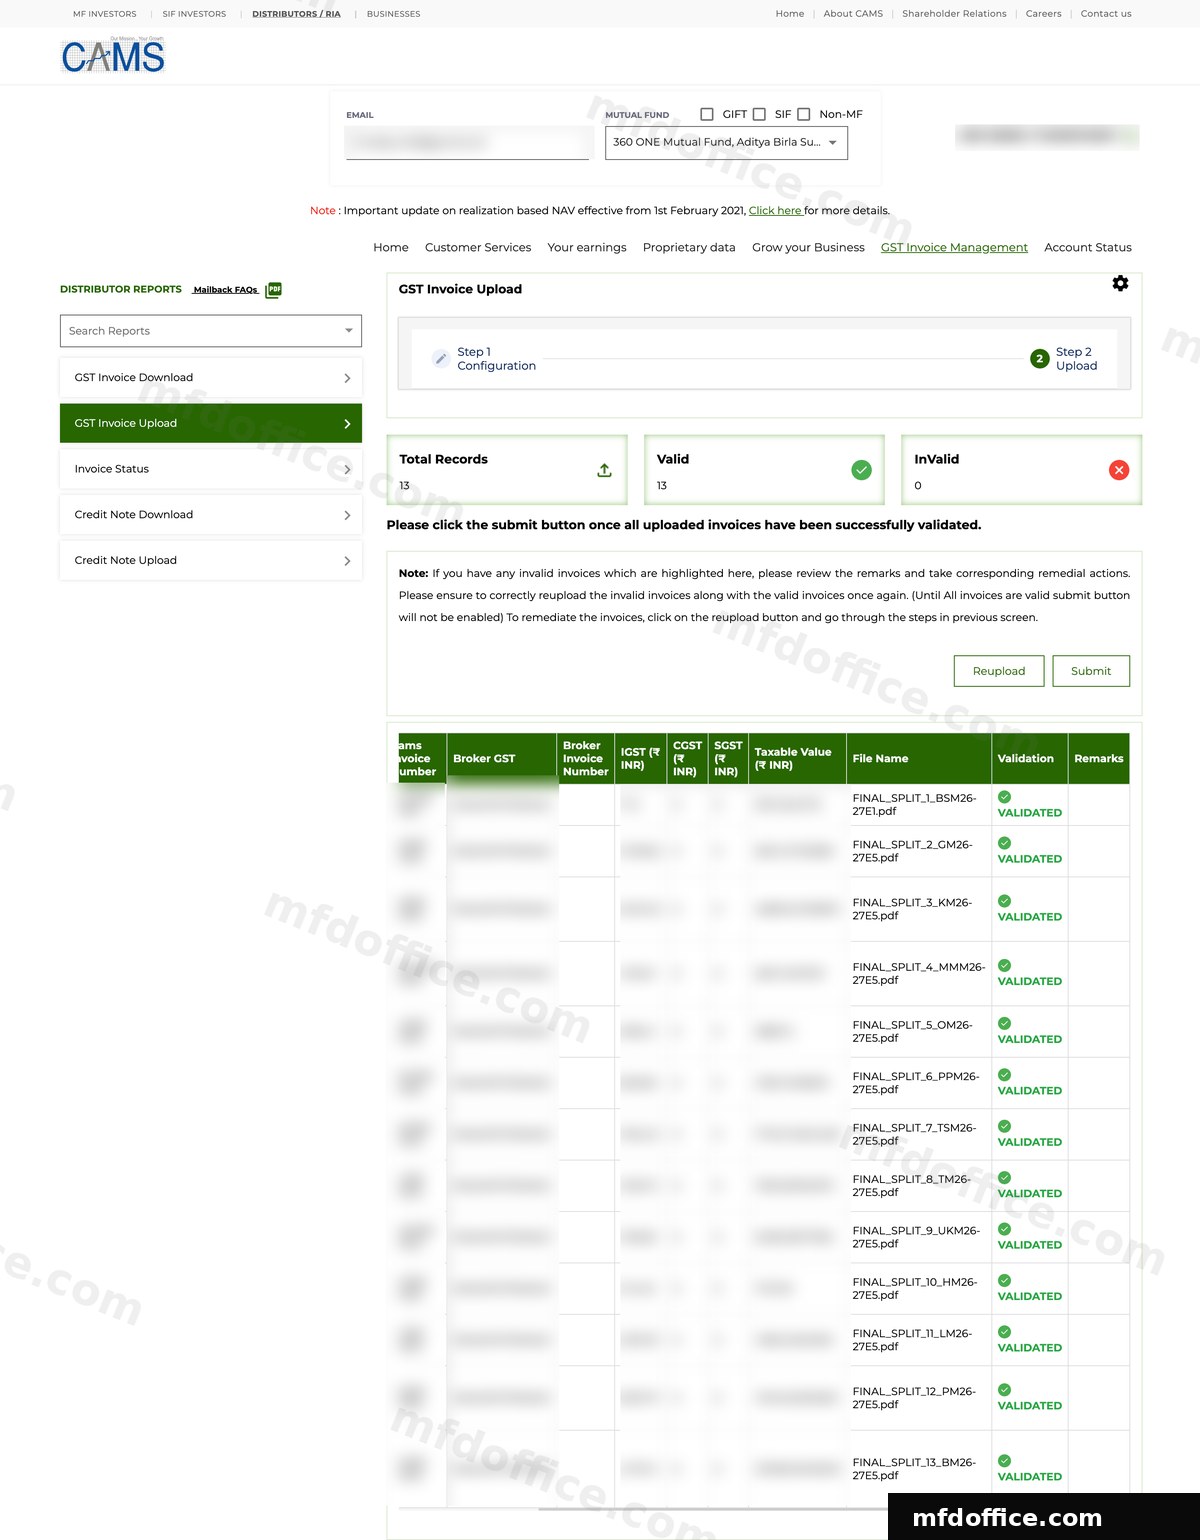
Once both files are in, CAMS shows a short pop-up to review the figures. Press Submit there, and CAMS moves you to a screen with a Total Records, Valid, and InValid count at the top. Give it a moment, CAMS is still validating every row here.
Right after upload, Valid and InValid both show 0 while CAMS checks every row. This settles in a moment.
Once it settles, check the Valid and InValid counts again. Once every row shows VALIDATED, press Submit. If a row is invalid instead, its Remarks column explains why, fix that and use Reupload to try again. If you are stuck on a remark, a screenshot of it helps us troubleshoot, but only send it to us if it looks like an MFD Office problem.
All 13 rows here show VALIDATED, so Submit is ready to press. Any invalid row would show its reason in the Remarks column on the right instead. Slide the picture sideways to see all of it.
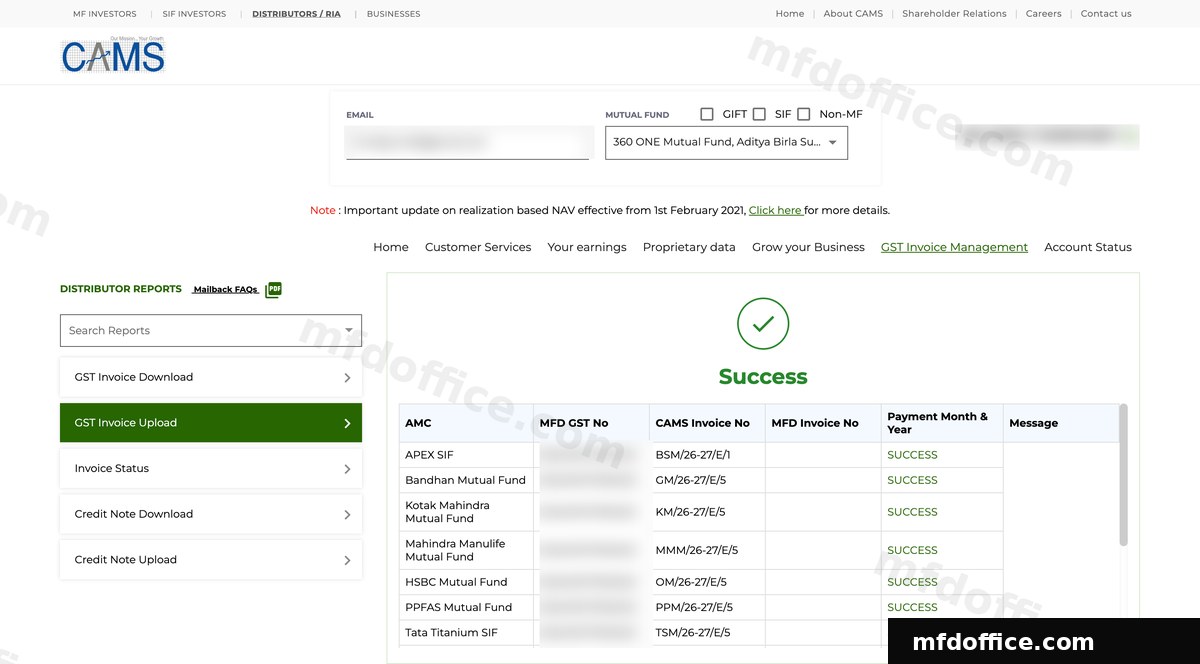
Press Submit once more and CAMS shows a Success screen with every fund house marked SUCCESS. That is CAMS done for the month.
SUCCESS against every fund house means CAMS has received your invoices.
📩CAMS will email you after your upload. Once the upload is successful, CAMS sends an email showing the invoices received, with their status marked as SUCCESS. This only confirms that CAMS received your upload. It does not mean the invoices have been approved or paid. Check the Invoice Status screen to see their current status.
⚠️This wizard asks two separate questions. Invoice Source asks whose invoice you are using: CAMS's invoice or your own. Signature & Execution Pathway asks how the invoice will be signed and uploaded: through CAMS's OTP e-Sign or by Manual Document Upload. For MFD Office users, the signing method is always Manual Document Upload, regardless of which Invoice Source you choose. You do not need to make a separate e-Sign choice.
KFIN goes by the trail month
The month the brokerage was earned. Both KFIN files must be for that same month.
CAMS goes by the payment month
The month the brokerage is paid. Both CAMS files must be for that same month.
🗓️The window is usually the 7th to the 15th of each month. Upload within it. If you miss it, the GST on that month's brokerage may not be paid to you until you upload a valid signed invoice.
After your invoices are done, two more jobs get easy
Uploading to the registrar gets the fund houses to pay you. But your GST work is not over: every invoice still has to be reported in your GSTR-1, and you still have to check the money actually arrives. MFD Office does both from the same invoices you just made. Nothing to retype. See the full list of GST work after the upload.
Your GSTR-1, prepared from the same invoices
By hand · on the GST portal
Typing every line yourself
Hours, every month
·Open every invoice and copy its details one by one
·Type each fund house's GSTIN, invoice number, and tax split into the portal
·One wrong digit in a GSTIN means a mismatch with the fund house's return
·Do it again next month, and every month
With MFD Office
One click, one file
A minute or two
✓Open the GST return tab and pick the month
✓Your KFIN and CAMS invoices are already there, with each fund house's GSTIN read from the invoice itself
✓Download one file made for the GST portal, plus an Excel your CA can check
Money In: check that every fund house actually paid you
By hand · bank statement
Hunting through entries
Easy to miss a short payment
·Brokerage and its 18% GST arrive as separate payments, at different times
·A bank statement never shows what a fund house still owes you
·A short payment of a few hundred rupees looks like any other credit entry
·Most MFDs simply never check
With MFD Office
Every invoice, checked as paid
Minutes a month
✓The Money In tab already knows what each fund house owes you, from your invoices
✓Brokerage and GST tracked separately, because they arrive separately
✓Upload a bank statement and payments are matched for you to confirm
✓Plain warnings like "SBI has paid ₹500 less brokerage than your invoice"
The invoices, the Excel sheets, the GSTR-1 file, and the payment check all come from one upload of the files you already download. Do it by hand and each of those is its own hours of work.
See it with your own file, free
Upload your KFIN or CAMS file and see one of your real, signed invoices. No signup, no card.
You ask for them on camsonline.com. Open GST Invoice Management, then GST Invoice Download, pick your fund houses and the payment month. Under Output format, either choice works: Separate PDF for each AMC (ZIP), or Single PDF - All AMC. Press Submit. CAMS sends the invoices to the email address registered with them. The same email also carries the Excel report, named GST_REPORT. Use that file when you upload, on the GST Invoice Upload screen, under CAMS-Generated Invoices if your turnover is ₹5 crore or under, or Your Own Invoice Format if it is above ₹5 crore.
Where do I get the KFIN Excel template?
On dss.kfintech.com, inside GST Invoice Management, open Signed GST Invoice Upload, click the Excel Based Upload tab, pick the month, then click Generate Excel Template. Do not type anything into the sheet; MFD Office fills it for you.
Which month do the files belong to?
KFIN goes by the trail month, the month the brokerage was earned. CAMS goes by the payment month, the month the brokerage is paid. On each side, both files must be for the same month.
Can I try it before creating an account?
Yes. On the free demo you upload your own KFIN or CAMS file and see one of your real, signed invoices made on the spot, with no signup and no card.
Please note: this page is general information, not tax advice. KFIN and CAMS can change their portals, menus, and templates, so always check the current instructions on dss.kfintech.com and camsonline.com, and confirm anything tax-related with your tax advisor.